Monday, December 19, 2016

Finding Time

Sometimes life gets busy and we don't always get to those projects right away.  I always love when I can get some time in my craft room.  I can spend hours in there and I normally have to be dragged out!  I value that I have a craft room where I can leave my projects out and sneak in and work on my them when I can.  Here is one of those projects that I started in September and it sat in my to do box until this weekend!     
As you can see I have a lot going on in my layout.  For the left side I created the background, large photo mat with watercolors!  I love how it turned out and it was super easy to do.  It is called Smooshing & Splooshing.  You get your watercolor paper wet and then add watercolor to it randomly here and there till you like what you see.  Then you can use any form of plastic you want and scrunch it up on your paper while the watercolor is still wet.  I used some old Walmart bags for my project.  Once it is dry, about an hour later your paper is ready to go.  I tore the edges of my photo mate for extra dimension and fun.

I combined the Rustic Home Fundamentals with the Uptown Fundamentals and matted my photos in CTMH's color the year, Sea Glass card stock.  I love how everything plays nicely and my layout comes together beautifully.
 
I also used my watercolors to create the splattered look on the background of each side.  Although it might be hard to see I did use 2 different colors.

I used some of the Adventure Compliments to embellish my page. 
 I did a little 'Ombre' look on my words by sponging Seaglass, Glacier, and Lagoon on the 'Little Moments'.  I love that I was able to coordinate my compliments to work with my color scheme.


I included a smaller flip flap to add a couple of action shots of my daughter and father showing their horses.  Hayley's horse placed and it was Hayley's first time in the ring!  We were excited for both them.

Other supplies used:

Gold Sequins
Gold Shimmer Ribbon - from the Uptown Ribbon Pack
Adventure Compliments

Hopefully I can find some more time to play in my craft room.  I have a box of new CTMH goodies coming soon.  I can't wait!  If you want a new CTMH Seasonal Expressions book you can contact me here.

Merry Christmas and Happy New Year to all of my supportive friends and family!

See you in the New Year with new goodies!!!

Lori 


Tuesday, November 22, 2016

Christmas Card Series Part 7

Just some fun random cards I created.   After creating wonderful layouts with your WYW's you always have leftover bits.   Why not put those bits to use and make some simple cards to share?


Above I used the wooden stars from the Oh Deer assortment.  Yes, they are actual bamboo!
I used the 'noel' from the City Sidewalks Complements.

Happy scrapping my friends!

Your creative coach and friend,

Lori
Friday, November 18, 2016

Christmas Card Series Part 6

I just LOVE the Oh Deer! Workshop Your Way!   The colors are so beautiful and it features CTMH's color of the year - Sea Glass!  

Here are 2 cards I created in a snap using the PML cards from the Oh Deer! paper pack.   I also ink distressed the edges with my new Sea Glass stamp pad to add dimension as well.
One PML card two different ways to create a fun and easy card!
Take some time to create some fun in your craft room this holiday season.

Till next time.

Your Creative Coach and Friend,

Lori
Tuesday, November 15, 2016

Christmas Card Series Part 5

Christmas is just around the corner!  Can you believe it?  Me either!!!  Are you getting your Christmas shopping done?  I have a few gifts to make and buy!  Time sure does fly during the holiday season.  Take a quick moment to enjoy a good cup of cocoa and watch one of your favorite holiday movies!

Here are 2 more cards I created using CTMH's City Sidewalks paper along with the PML cards from this kit to create 2 fun and easy cards.
 Again, just a couple of embellishments along with glitter paper and I have 2 fun cards to share.

Till next time - happy scrapping!

Your creative coach and friend,

Lori

Friday, November 11, 2016

Christmas Card Series Part 4

More Christmas card fun and inspiration!  For these two cards I used CTMH's 'Season of Magic' stamp set.  You can create a variety of Christmas cards and regular cards perfect for any occasion.


My cards came together with ease by using some leftover scraps of paper from the City Sidewalks paper pack, PML cards and a few embellishments.

Throw in a little glitter paper and your card sparkles!

Remember to check back for more Christmas card inspirations.

Your creative coach and friend,

Lori
Tuesday, November 8, 2016

Christmas Card Series Part 3

Since I live in Central Texas we don't see much snow.  On rare occasions we get a sprinkling, but not till March.  So no White Christmas for me.  That is ok because I can create beautiful cards with snow flakes using CTMH's newest Snow Flake Thin Cuts.
 
 I used Oh Deer! PML cards from the Oh Deer Workshop Your Way in combination with scraps of Oh Deer! scraps of paper and zip strips to create this series of cards.
 For the above card I used the negative space from my snow flake cut and backed it with white glitter paper.  Don't worry about getting glitter all over the place!  With CTMH's glitter paper the glitter stays on the paper not your hands and face!
 With just a few sparkles and snippets of Sea Glass glitter paper I have beautiful cards to send out to my family and friends for the upcoming holiday season.

Till next time -

Happy Scrapping

Your creative coach and friend,

Lori

Thursday, November 3, 2016

Christmas Card Series Part 2

Christmas happens to be one of my favorite holidays.  I love all of the lights, Christmas carols, Christmas movies, the lights on the tree, hanging ornaments, and decorating the house.

Here are three cards I created using City Sidewalks Picture My Life Cards and left over scraps of paper from my card class.  Using your PML cards is a great way to create super fun cards in a snap.

I also used the Happy Holidays stamp set that comes with the Happy Holidays Workshop Your Way.

Cards come together with ease with just a few embellishments like ribbon, sparkles, gems, and such.  CTMH embellishments are a great buy starting at $2.95!  Make sure you grab some embellishments on your next order! 


Till next time,

Happy Scrapping!

Your scrap coach and friend,

Lori 

Tuesday, November 1, 2016

Christmas Card Series Part 1

Can you believe it is November already!  Holy smokes - Christmas is just around the corner.  Have you gotten your holiday cards done?  For those of you that are local in my area I have a fabulous way that you can make a lot of fun cards for just $25!  Check out this link to my FB event for my upcoming Christmas Card Buffet on 11/12.   Contact me if you have any questions.

Here are some fun cards I created using Close to my Heart's Stamp of the Month - Yuletide Joy.  These cards are super cut and easy to make!


For these two cards I used the Oh Deer! paper packet along with sparkles, and gold shimmer trim.


On this card I used City Sidewalks paper pack along with  Rustic Home ribbon and more sparkles.

Stay tuned for more Christmas Card inspiration.  I will be posting throughout the month of November!


Till next time...

Your creative coach and friend,


Lori


Tuesday, October 25, 2016

Field Musuem - Chicago

After our tournament was done we ended up having a full day to kill before heading back home.  We decided to spend the day at Chicago's Field Museum, which one of the world's largest museums of natural history.  The girls started off the day with a famous classic hot dog Chicago style.  


 For my layout I used CTMH's new Enchanted Fundamentals along with the School 7 -12 Complements.  Above is my layout before I add the new CTMH Memory Protectors.
Above you can see how big the museum is from the outside.  When you first walk into the museum you see 'Sue'  who is the largest, best-preserved, and most complete Tyrannosaurs ever found.  Sue measures 42 feet long and is 13 feet tall.  She has 58 dagger-like teeth!  Can you imagine that coming at you?

The museum had a large prehistoric section.  We also went through the Greek history, ancient Egypt, Native American, insects, and so much more.  Big cities = great museums!
 Since I took so many photos, but didn't want to do more then one layout I used the new Memory Protectors Pocket Plus from CTMH.
I used the horizontal and vertical design so that I could include all of the pictures I took of the exhibits.  I was able to add a total of 20 photos!  Love it!
One of the reasons I wanted to go to this museum was to see the  Terracotta Warriors from China's first emperor that they had on display.  I have always wanted to see them and it was the perfect opportunity.  Can you imagine un-earthing these statues?  What a find.  The museum truly had everything.
 By the end of the day we were pooped!   Time to get back home and get back to our Texas life.  

Till next time make sure you print those pictures and get them preserved to share with your family and friends.

Your creative coach,

Lori

Tuesday, October 18, 2016

19 Things You May Not Know About Our My Acrylix® Stamps

19 Things You May Not Know About Our My Acrylix® Stamps

Think you know everything about our exclusive My Acrylix® stamps? Put your knowledge to the test by reading the list below!

1. We have French and Spanish stamp sets.
19 Things You May Not Know About Our My Acrylix® Stamps! #closetomyheart #ctmh #stamping #clearstamps #crafting #scrapbooking #cardmaking #stampinghelp #myacrylix #howtostamp

2. If you see a stamp image outlined in red, that means it coordinates with one of the shapes from our Cricut® collections. If it’s outlined in blue, that means it coordinates with one of our Thin Cuts dies.

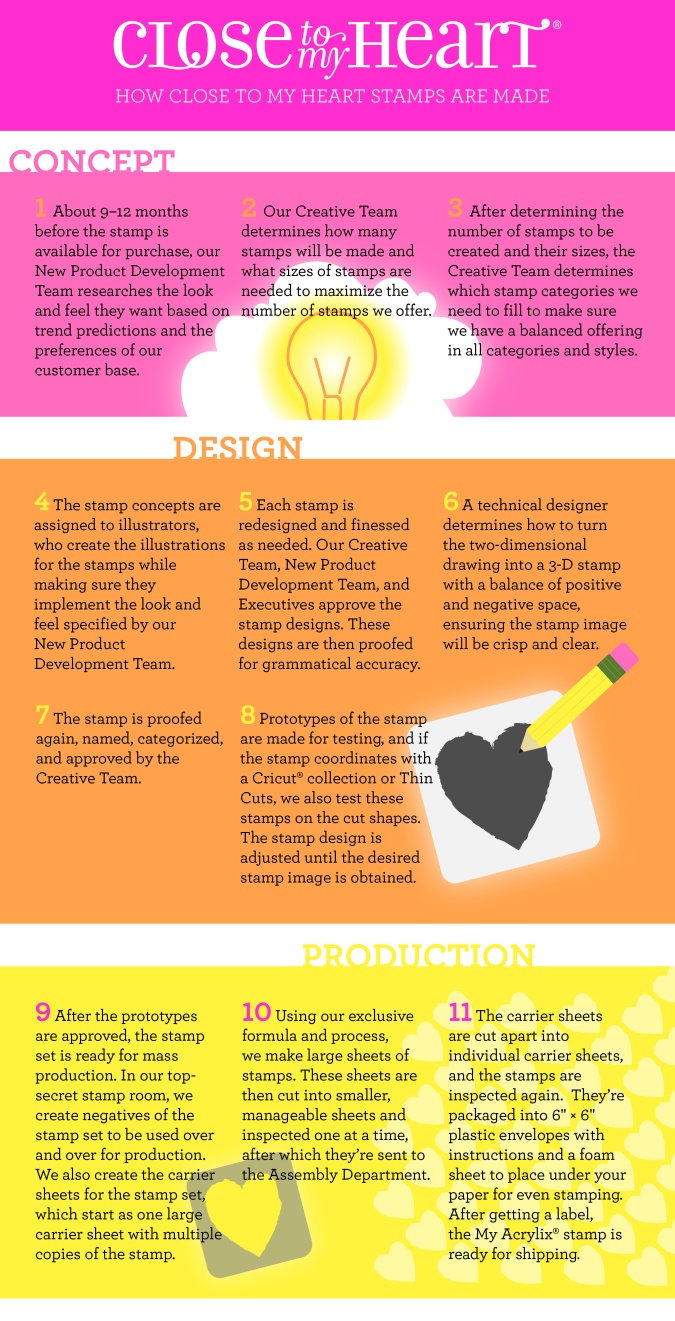
3. We put A LOT of thought and effort into making the best stamps for our customers. See the entire process in this infographic:
19 Things You May Not Know About Our My Acrylix® Stamps! #closetomyheart #ctmh #stamping #clearstamps #crafting #scrapbooking #cardmaking #stampinghelp #myacrylix #howtostamp

4. After we design each paper packet, we create two coordinating stamp sets, one for scrapbooking and one for cardmaking, to be paired with that specific paper. These two stamp sets can be found in the idea book right behind the coordinating Workshops Your Way™ scrapbooking kits. 

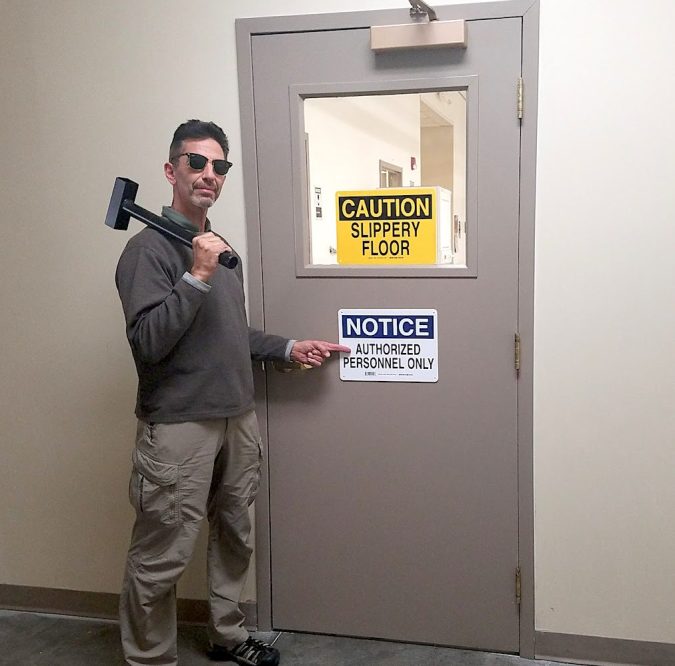
5. Our stamps are made right here at the Home Office, in a top-secret room.
19 Things You May Not Know About Our My Acrylix® Stamps! #closetomyheart #ctmh #stamping #clearstamps #crafting #scrapbooking #cardmaking #stampinghelp #myacrylix #howtostamp

6. It takes about one hour to make one sheet of stamps from start to finish.

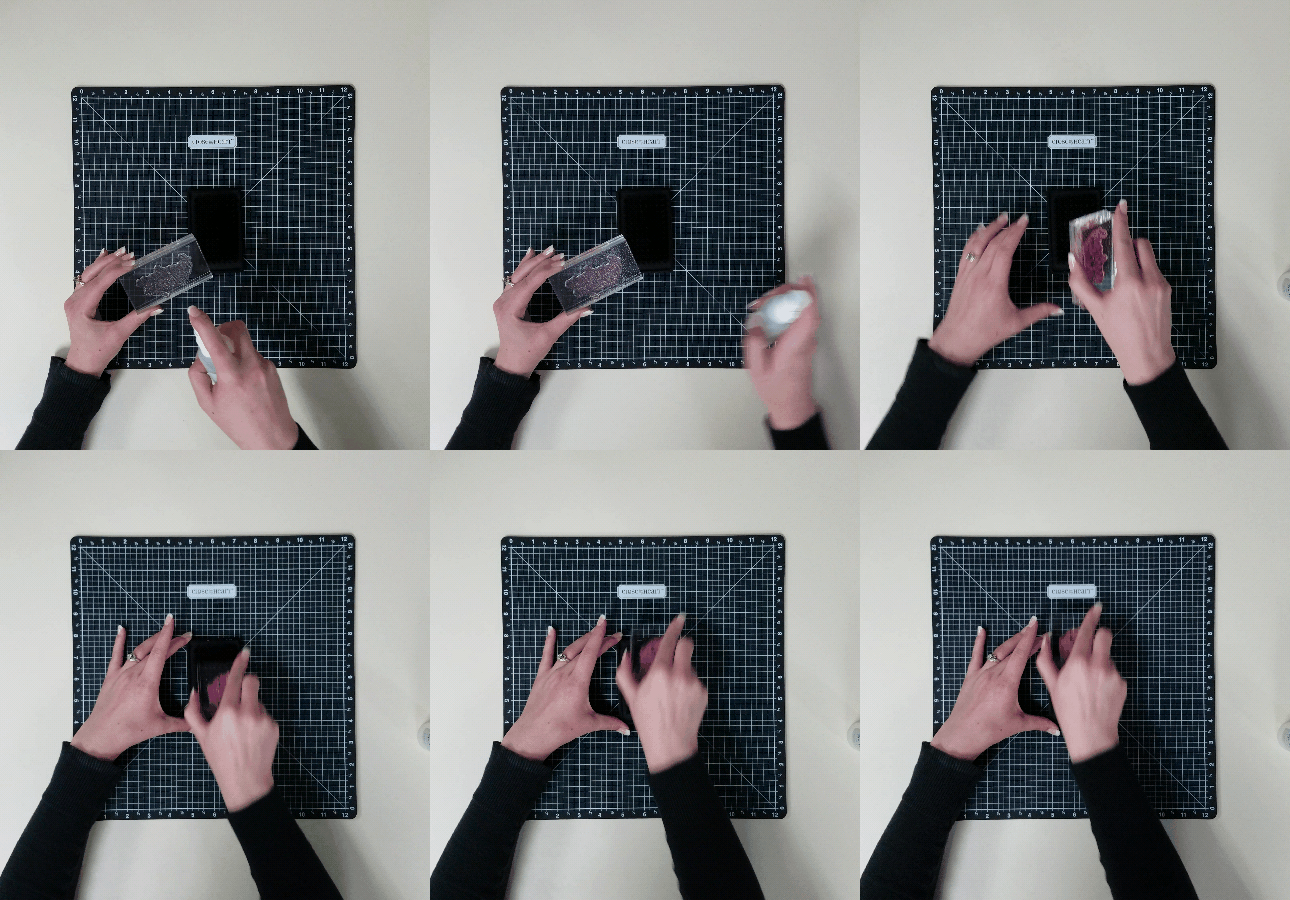
7. New stamps work best when you “season” them. To do so, rub the stamp across a stamp pad, and then stamp onto scrap paper until the image is even.
19 Things You May Not Know About Our My Acrylix® Stamps! #closetomyheart #ctmh #stamping #clearstamps #crafting #scrapbooking #cardmaking #stampinghelp #myacrylix #howtostamp

8. Our stamps can be used with all sorts of inks, including dye, pigment, solvent, and alcohol inks.

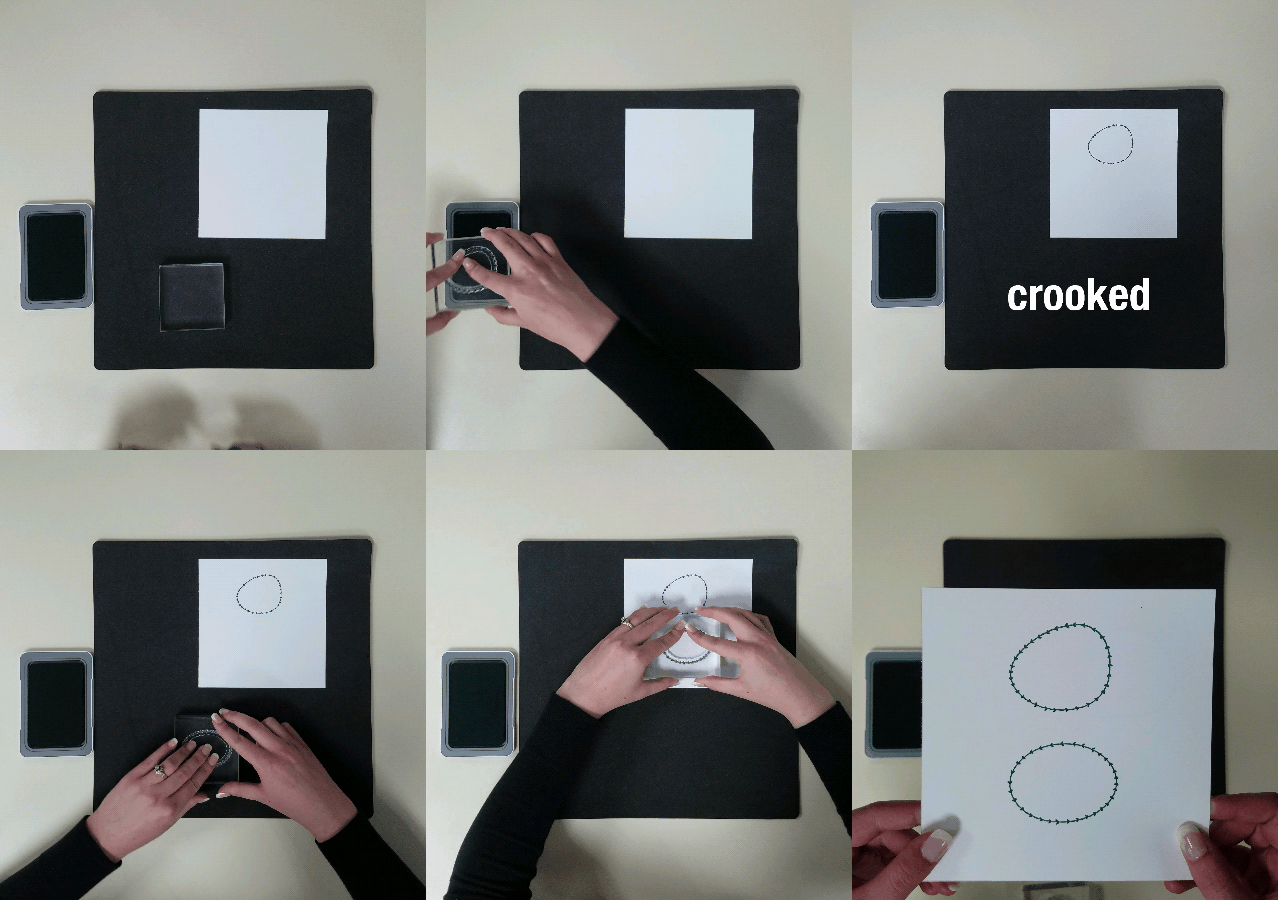
9. Rather than attaching your stamps to your blocks, try using your blocks to pick up your stamps from a flat surface. This way, the stamp will hold its natural shape.
19 Things You May Not Know About Our My Acrylix® Stamps! #closetomyheart #ctmh #stamping #clearstamps #crafting #scrapbooking #cardmaking #stampinghelp #myacrylix #howtostamp

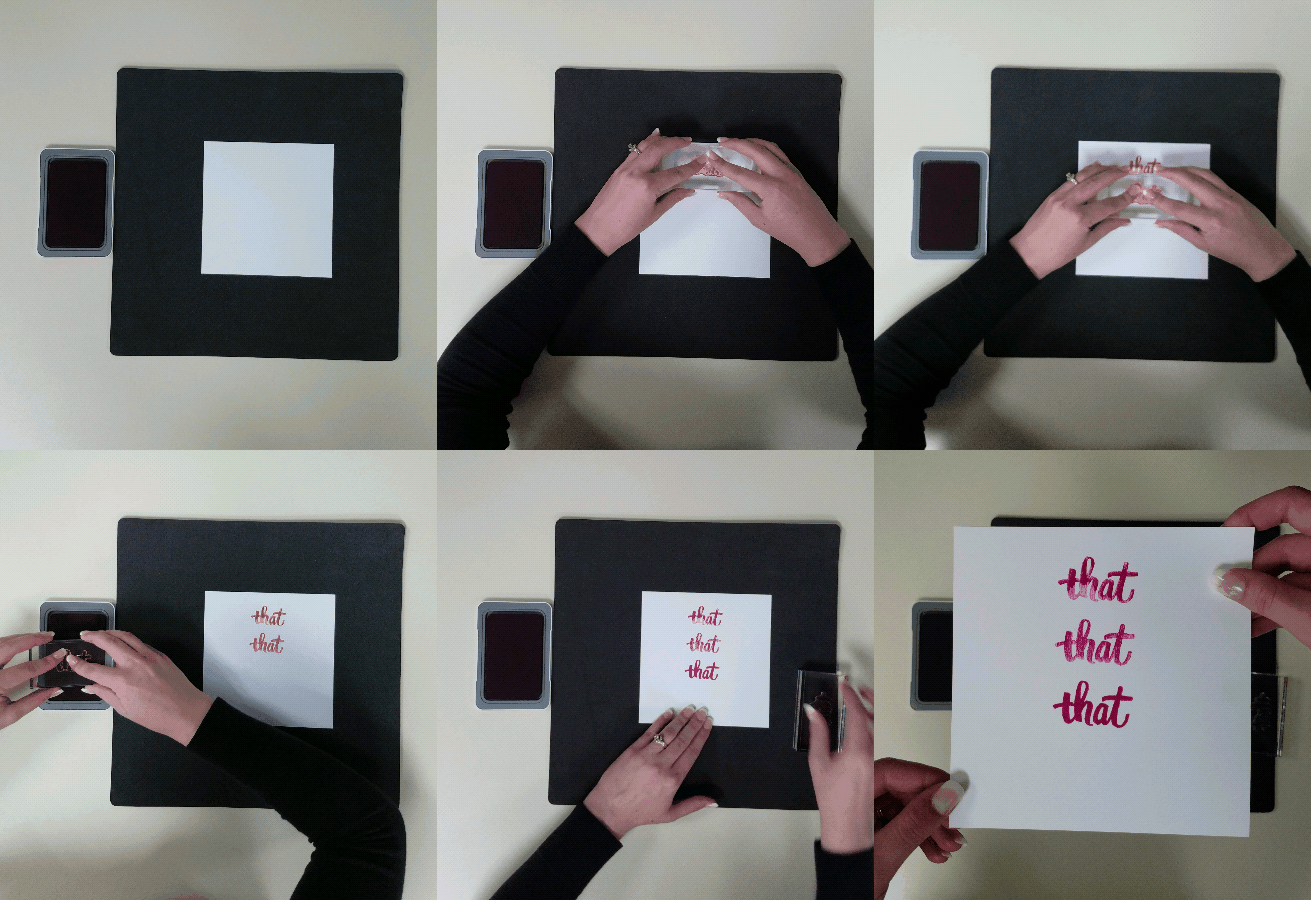
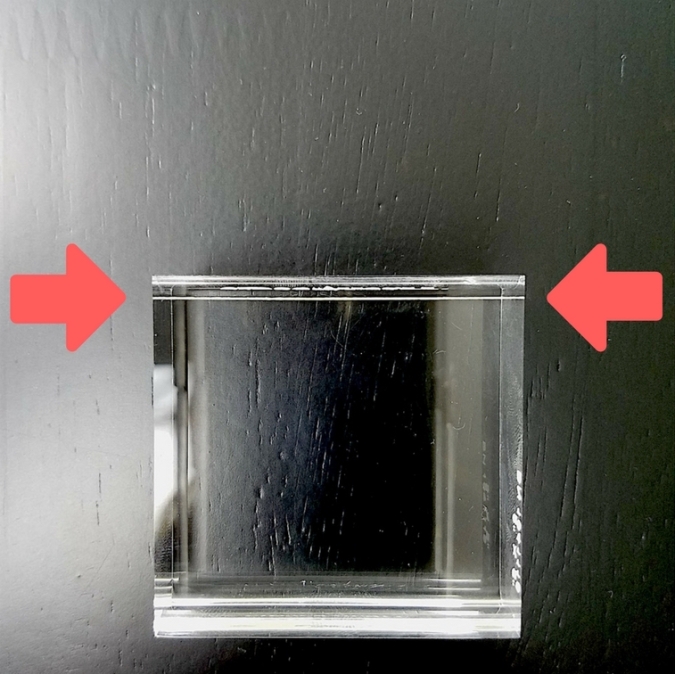
10. Our My Acrylix® blocks have a small white horizontal line on them to help you with stamp placement, which is especially helpful for keeping words and borders straight.
19 Things You May Not Know About Our My Acrylix® Stamps! #closetomyheart #ctmh #stamping #clearstamps #crafting #scrapbooking #cardmaking #stampinghelp #myacrylix #howtostamp 

11. Some people cut apart their stamps in order to rearrange words in a sentiment when sticking them to their blocks.

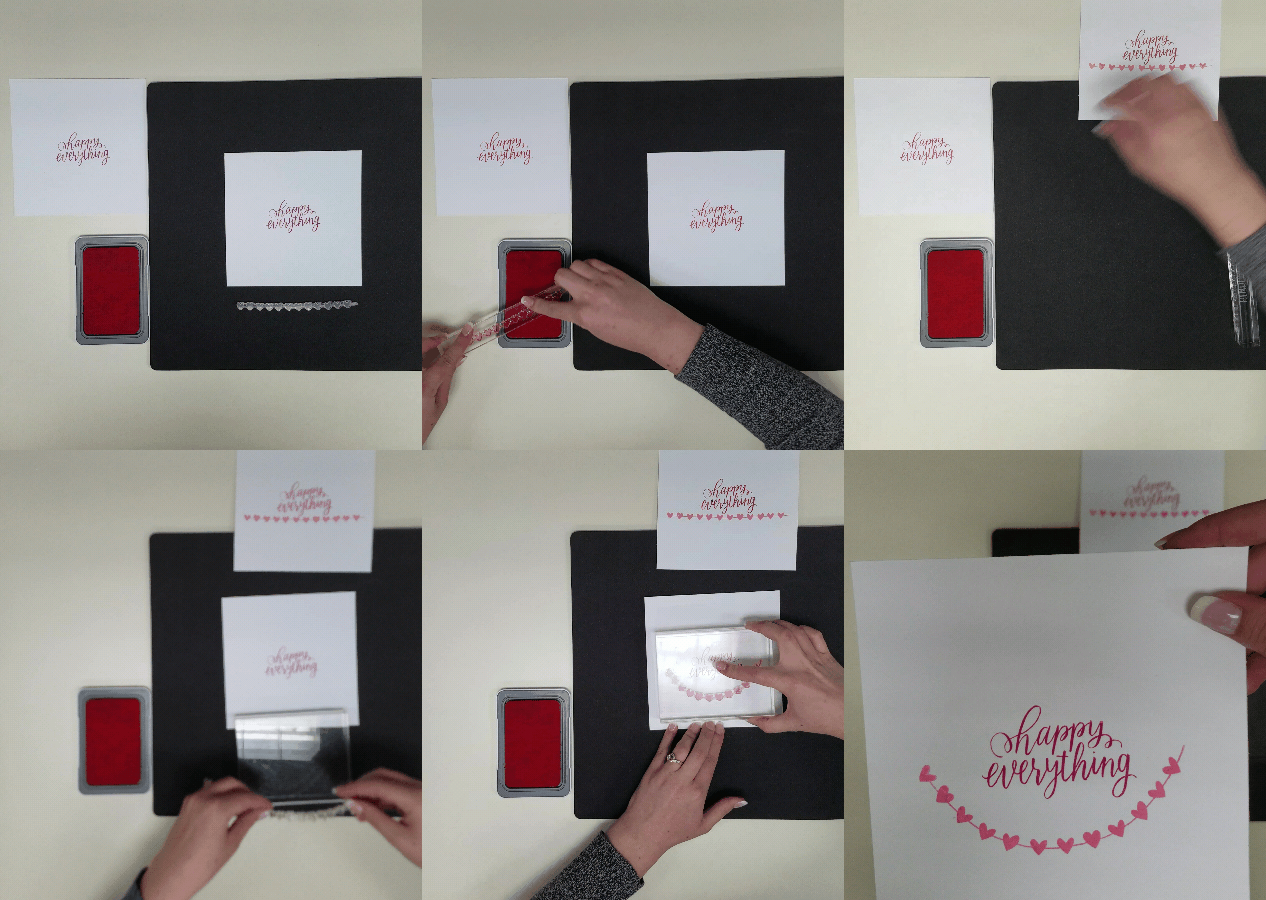
12. Our stamps are flexible! Manipulate them so they fit inside shapes and banners, or just to get a different look!
19 Things You May Not Know About Our My Acrylix® Stamps! #closetomyheart #ctmh #stamping #clearstamps #crafting #scrapbooking #cardmaking #stampinghelp #myacrylix #howtostamp 
13. If some of your ink doesn’t transfer when stamping, quickly breathe over the stamp to re-moisten the remaining ink and then stamp over the image again. The missing portion usually blends into the existing image if the ink isn’t too dry. This is called the Huffing or Stamp Over Technique.

14. Because our stamps and blocks are clear, you can easily stamp over the image again to get a richer, deeper image.
19 Things You May Not Know About Our My Acrylix® Stamps! #closetomyheart #ctmh #stamping #clearstamps #crafting #scrapbooking #cardmaking #stampinghelp #myacrylix #howtostamp
15. If you’re looking to remove that stubborn pigment ink, try our Spritz Cleaner and Stamp Scrubber. It makes it easy!
19 Things You May Not Know About Our My Acrylix® Stamps! #closetomyheart #ctmh #stamping #clearstamps #crafting #scrapbooking #cardmaking #stampinghelp #myacrylix #howtostamp
16. Our stamps don’t need to tan—they like being transparent, so keep them out of the sun!

19 Things You May Not Know About Our My Acrylix® Stamps! #closetomyheart #ctmh #stamping #clearstamps #crafting #scrapbooking #cardmaking #stampinghelp #myacrylix #howtostamp
 
17. Our stamps come in handy envelopes, which fit into our My Acrylix® organizer. You can also use our large organizer and tabs to store even more stamps. We also have a mini organizer for those mini stamp envelopes.
19 Things You May Not Know About Our My Acrylix® Stamps! #closetomyheart #ctmh #stamping #clearstamps #crafting #scrapbooking #cardmaking #stampinghelp #myacrylix #howtostamp 
18. If your stamps ever start to lose their stickiness, all you need to do is rinse them with warm water and soap, and the stickiness will come right back. You can also use StazOn™ cleaner on the smooth side of the stamp.

19. Some stamps make great friends, like our good ol’ friend, Sticky Boy!
19 Things You May Not Know About Our My Acrylix® Stamps! #closetomyheart #ctmh #stamping #clearstamps #crafting #scrapbooking #cardmaking #stampinghelp #myacrylix #howtostamp

Tuesday, October 11, 2016

Chicago Tournament - Part 2

Hayley had such a good time at Millennium Park that we decide to take some senior pictures with her dressed up.

This time I used the Uptown Fundamentals for her 'Downtown' pictures along with the Happy Life Compliments.    I really love how this page turned out with the colors mixing and matching with such ease. 
Incorporating the Memory Protectors Pocket Plus really does make it so easy to use all of the pictures that I want to use.  Plus, I always take so many and have a hard time deciding which ones to use or not use.  Now I can use them all! 
Here is a close up of some of the embellishments I used.  I love using CTMH's 3D foam tape to pop up my embellishments for added dimension.
Above I used CTMH's Liquid Glass to add shine to the heart and peep hole on my camera.  You can also see a close-up of some of the vellum compliments that come in the Happy Life Complements package.  Fun and easy to use!

Till next time, your creative coach,

Lori

Tuesday, October 4, 2016

Chicago Tournament Layout - Part 1

So for one of Hayley's volleyball tournaments we flew to Chicago!  We made sure to try Chicago's best pizza at Giordano's!  The line to get in was at least an hour!  After eating a couple of us moms took the girls downtown to the Millennium Park to see the sites.
For this layout I did some splatter technique using my watercolors.  I am loving how easy it is to pull a layout together with our new fundamentals.  I used the new Adventure fundamentals along with the Good Life Complements.  Above is my layout w/o flip flaps.
With CTMH's new memory protectors pocket plus I was able to add 6 more photos w/o creating another layout!  As you can see the girls had a great time seeing the downtown sites of Chicago.
Above is my layout with the memory protector open to the left.  I added some of the compliments to the outside of the protector for added dimension. 

Till next time make sure you take some time to capture those special moments to share for years to come.

Your creative coach,

Lori

Thursday, September 29, 2016

Thanks

It is always nice to have Thank You cards on hand to show your appreciation.  Here are some of the cards I created for Hayley's graduation.  After using my new dry embossing folders with the new emerald green card stock I swiped the top with my emerald green stamp pad to add dimension. 

 I added a couple strips of emerald green shimmer paper for a pop of color.   Glitter always makes your cards fun and prettier!

 I love how easy I can add a sentiment with CTMH's new thin cuts.  So pretty!